
Use Azure DevOps pipelines for continuous delivery of APIs to Azure API Management Service
One of my customers is on a journey to re-architect old on-premises web applications to more modern webApps using APIs. All APIs should use Azure DevOps CI/CD pipelines and will only be exposed through Azure API Management Service. We wanted to ensure that every time a developer has released a new build the API definition in APIM would get updated.
The challenge was that if a new build was created and released, the Swagger file of the APIapp would be updated but not the API definition of the API in APIM. Once you import and publish an API in APIM it will not be updated automatically. So, even though the developers released a new build, the consumers would still consume the older version of the API published in APIM. If we have 10 APIs with each 3 environments and we do, let’s say, 5 releases a week that’s 150 manual updates to APIM.
If we have continuous deployments for our webApps, we want continuous deployments for our APIM as well.
Introduction
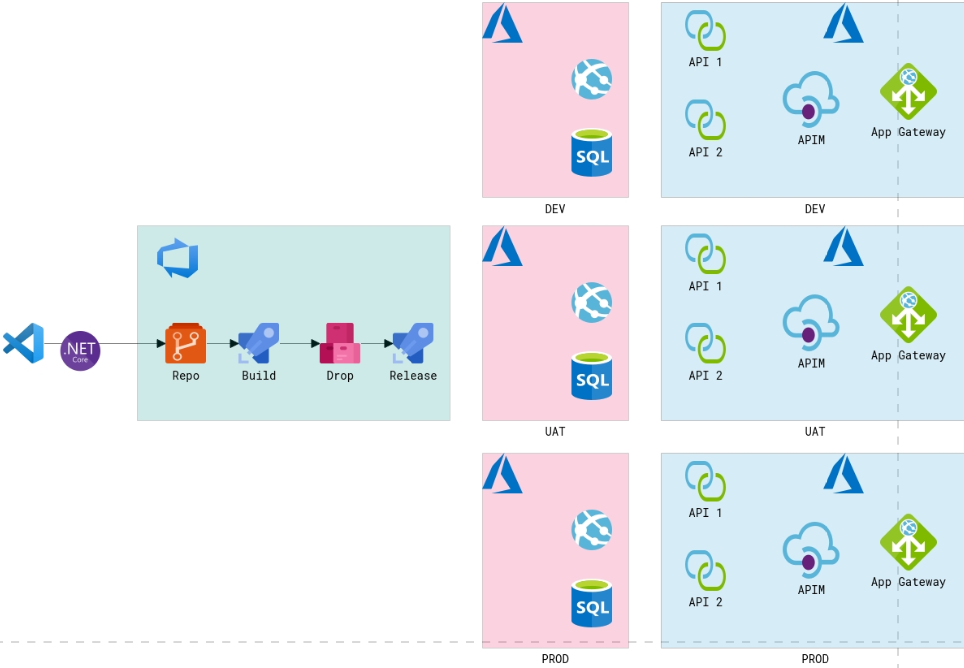
The release contains 3 stages to deploy to DEV, UAT and Production respectively as seen in the diagram below:
We first looked at the APIM DevOps Resource kit to keep the APIs in sync. But that was overly complicated for what we wanted to achieve. A quick search in the Azure DevOps marketplace revealed the following extensions from Stephan Eyskens.
Setup the pipeline
First, install the extension in your Azure DevOps environment.
Next, add the following tasks to your pipeline:
-
Download Build Artifact. As we are working with a multi-staged pipeline with multiple jobs we can’t refer to the drop file being created as part of our Build stage. To solve this, we need to download the build artifact in every release stage.
-
AzureRmWebAppDeployment. This task will take the downloaded build artifact and deploy it to our API app in Azure.
-
PowerShell task to parse the Swagger file. This task will parse our Swagger JSON file and extract things like the name, display name etc of our API. It happened to me before that a Dev guy would come up with a name, we would setup the pipeline but once the business saw the name they wanted it changed so I had to change my pipeline or my variables. Now, if the Dev guy changes something in the Swagger file it will get processed and the API in APIM will change automatically.
-
Create/Update API. This task will create or update the API in APIM based on the Swagger file and also set different API policies for dev, uat and prod. This task will also update the API in APIM in case the Dev guy will create new API methods or remove API methods.
-
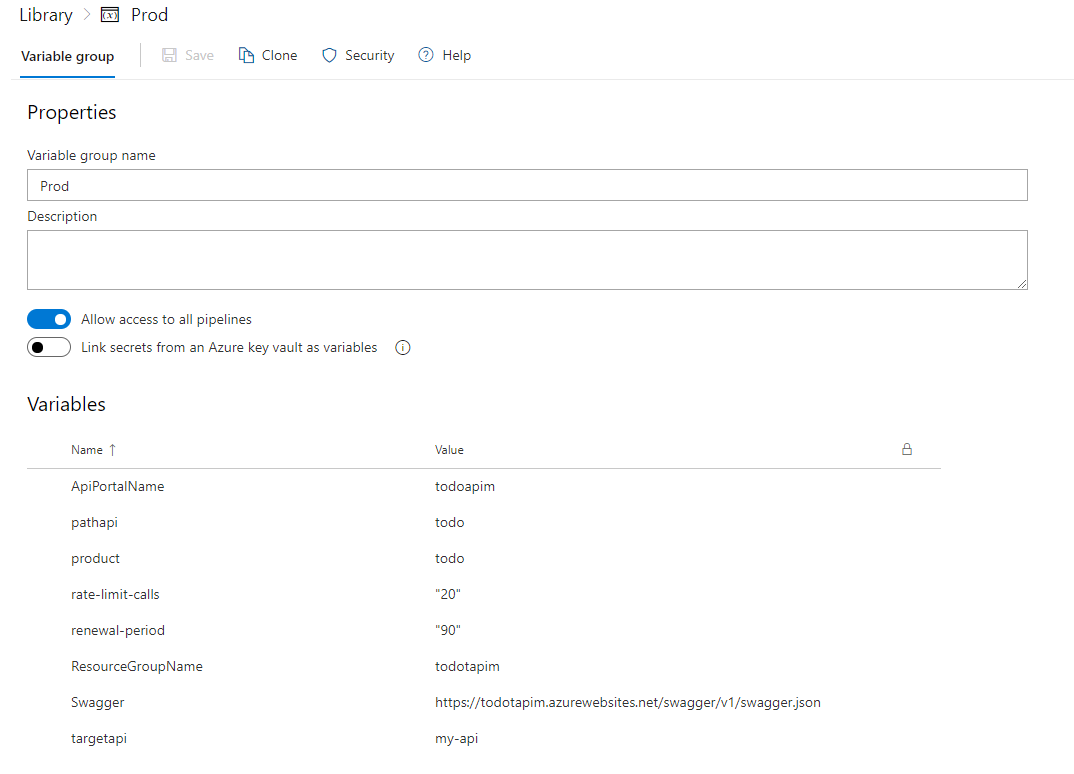
Create 3 variable groups with the following settings.
NOTE I’m not going to explain how to setup a build for your dot Net solution. I assume you already have this in place.
Copy the following yaml content into your pipeline.
- stage: PROD
  displayName: "Release to PROD"
  condition: succeeded('UAT')
  variables:
    - group: Prod
  jobs:
    - job: PROD
      displayName: "Deploy to Prod"
      steps:
      - task: DownloadBuildArtifacts@0
        displayName: "Download Build Artifact"
        inputs:
          buildType: 'current'
          downloadType: 'single'
          artifactName: 'drop'
          downloadPath: '$(System.ArtifactsDirectory)'
      - task: AzureRmWebAppDeployment@4
        displayName: "Deploy to Azure APIapp"
        inputs:
          ConnectionType: 'AzureRM'
          azureSubscription: 'Microsoft Azure Sponsorship New'
          appType: 'apiApp'
          WebAppName: 'todotapim'
          packageForLinux: '$(System.ArtifactsDirectory)/drop/*.zip'
      - task: PowerShell@2
        displayName: "Parse Swagger file"
        inputs:
          targetType: 'inline'
          script: |
            Write-Output '$(Swagger)'
            $swagger = Invoke-WebRequest '$(Swagger)' -UseBasicParsing | convertfrom-json
            $value = $swagger.info.title
            Write-Output "##vso[task.setvariable variable=Output_Title]$value"
      - task: stephane-eyskens.apim.apim.apim@3
        displayName: "API Management - Create/Update API"
        inputs:
          ConnectedServiceNameARM: 'Microsoft Azure Sponsorship New'
          ResourceGroupName: $(ResourceGroupName)
          ApiPortalName: $(ApiPortalName)
          UseProductCreatedByPreviousTask: false
          product1: $(product)
          OpenAPISpec: v3
          swaggerlocation: '$(Swagger)'
          targetapi: '$(targetapi)'
          pathapi: '$(pathapi)'
          DisplayName: '$(Output_Title)'
          TemplateSelector: Custom
          Custom: |
            <policies>
                <inbound>
                    <base />
                    <rate-limit calls=$(rate-limit-calls) renewal-period=$(renewal-period) />
                </inbound>
                <backend>
                    <base />
                </backend>
                <outbound>
                    <base />
                </outbound>
                <on-error>
                    <base />
                </on-error>
            </policies>
          MicrosoftApiManagementAPIVersion: '2018-01-01'
- Please note that the API task from the market place is not fully compatible with YAML pipelines yet. It works perfectly fine but the pipeline is going to highlight it as not supported.
- You will also not be able to edit the settings of the task in your YAML pipeline. A work around for this is to create a classic pipeline, add the task, configure the settings and copy the YAML configuration.
- I also struggled a bit with the APIM policy. YAML pipelines don’t like XML code inside the YAML file. The work around for this was to set the integer values in the variable groups as per screenshot above.
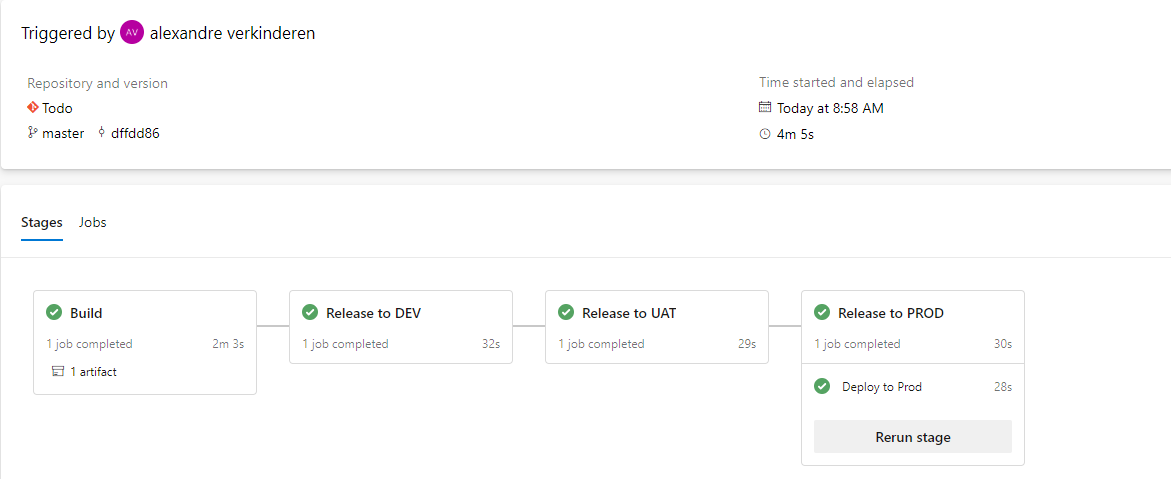
Let’s trigger our pipeline.
Conclusion
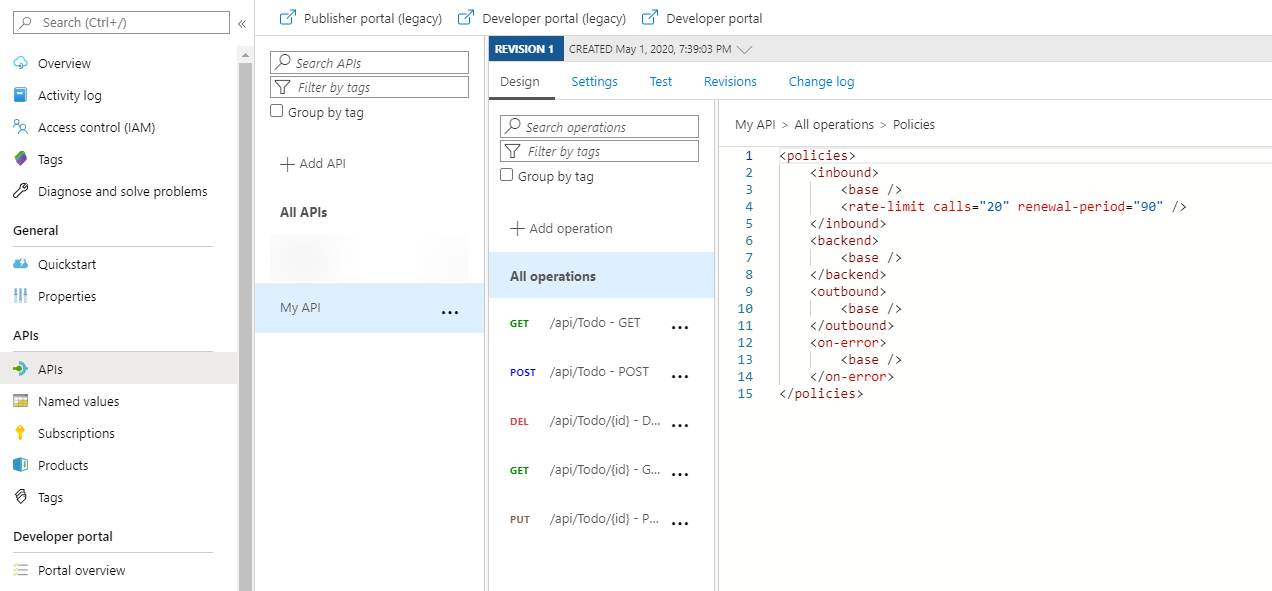
As you can see our APIs have been created/updated in APIM and our policies have been set as well. :smiley:
Now, every time a developer is releasing a new version of the API the API definition in APIM will be updated.
Thanks,
Alex
Leave a comment