Getting started with the Azure Iot DevKit
I finally got my hands on some Azure IoT Developer kits! In this blogpost I will cover how to get started with the Devkit, make sure it’s connected to the internet, upgrade the firmware and install all the prerequisites on your computer.

Introduction
The IoT Development Kit is based on the MXChip AZ3166 board. The AZ3166 board is Arduino compatible with a very large number of peripherals and sensors built directly on the board. This board is being built as an ideal platform for prototyping IoT and Smart Device solutions. The main control unit of the AZ3166 is a EMW3166-a low power consumption Wi-Fi module developed by MXCHIP. With a DAP Link emulator and 128×64 OLED and other resources such as LED lights. The development kit has an audio processing unit to connect to Azure for voice recognition and voice play. The full list of all features:
- EMW3166 Wifi module with 256K SRAM,1M+2M Byte SPI Flash
- DAP Link emulator
- MicroUSB
- 3.3V DC-DC,maximum current 1.5A
- Codec,with ,microphone and earphone socket
- OLED,128×64
- 2 user button
- 1 RGB light
- 3 working status indicator
- Security encryption chip
- Infrared emitter
- Motion sensor
- Magnetometer sensor
- Atmospheric pressure sensor
- Temperature and humidity sensor
- Connecting finger extension interface

Getting started
IoT projects rely on internet connectivity. So the first thing you will need to do is configuring your IoT devkit to connect to your wireless network.

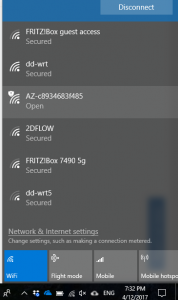
Hold down button B, push and release the reset button, and then release button B. Your DevKit enters accespoint or AP mode for configuring Wi-Fi. The screen displays the service set identifier(SSID) of the DevKit and the configuration portal IP address:
Then connect to the new wireless using your laptop
and browse to the IP address shown in the screen of your DevKit:

Select the Wi-Fi network that you want the DevKit to connect to, and then type the password. Select Connect. As soon as you do this the Devkit will try and connect to your wireless network:

When the connection succeeds, the DevKit reboots in a few seconds. You then see the Wi-Fi name and IP address on the screen

Upgrading the firmware
As soon as the Devkit connects to the internet it will check if there is a new firmware available. As you can see my firmware was not the latest one so I quickly upgraded it to the latest version:

Download the latest version from here.
- Drag & drop the .bin file you downloaded to AZ3166 device.
![]()
Wait until the file is copied, then the DevKit will reboot to the latest firmware.
- After this is done, you will see the new firmware version on the screen of the kit.

Prepping your development environment
You will need to download the latest development environment from here. The zip file contains the following tools and packages:
If you already have some of them installed, the script will can and skip them.
- Node.js and Yarn: Runtime for the setup script and automated tasks.
- Azure CLI 2.0 MSI – Cross-platform command-line experience for managing Azure resources. The MSI contains dependent Python and pip.
- Visual Studio Code (VS Code): Lightweight code editor for DevKit development.
- Visual Studio Code extension for Arduino: Extension that enables Arduino development in Visual Studio Code.
- Arduino IDE: The extension for Arduino relies on this tool.
- DevKit Board Package: Tool chains, libraries, and projects for the DevKit
- ST-Link Utility: Essential tools and drivers.
During installation, you can see the progress of each tool or package being installed

Sensors
Now that we have everything installed and up and running, let’s test the built in sensors. Just press the button B once to test the sensors:
Teaser: I’m going send the data generated by the sensors to IoT hub later on.
Conclusion
It was really easy to configure my Azure Iot Devkit and connect it to the internet. In less than 30 minutes everything was connected, upgraded and installed. In fact it took me longer to write this blogpost than to get started with the Azure Iot Devkit.
I will experiment with some cool projects in the next coming days/weeks and connect my Devkit to Azure IotHub . So stay tuned for some exciting experiments!
Leave a comment