
Installing Windows Virtual Desktop
Windows Virtual Desktop (or WVD) was finally released a few weeks back. This blog post will be part of a series of Windows Virtual Desktop related posts.
- Part 1: Installing Windows Virtual Desktop
- Part 2: Deployment issues
Before we get started have a look here for an overview of the terminology used in WVD.
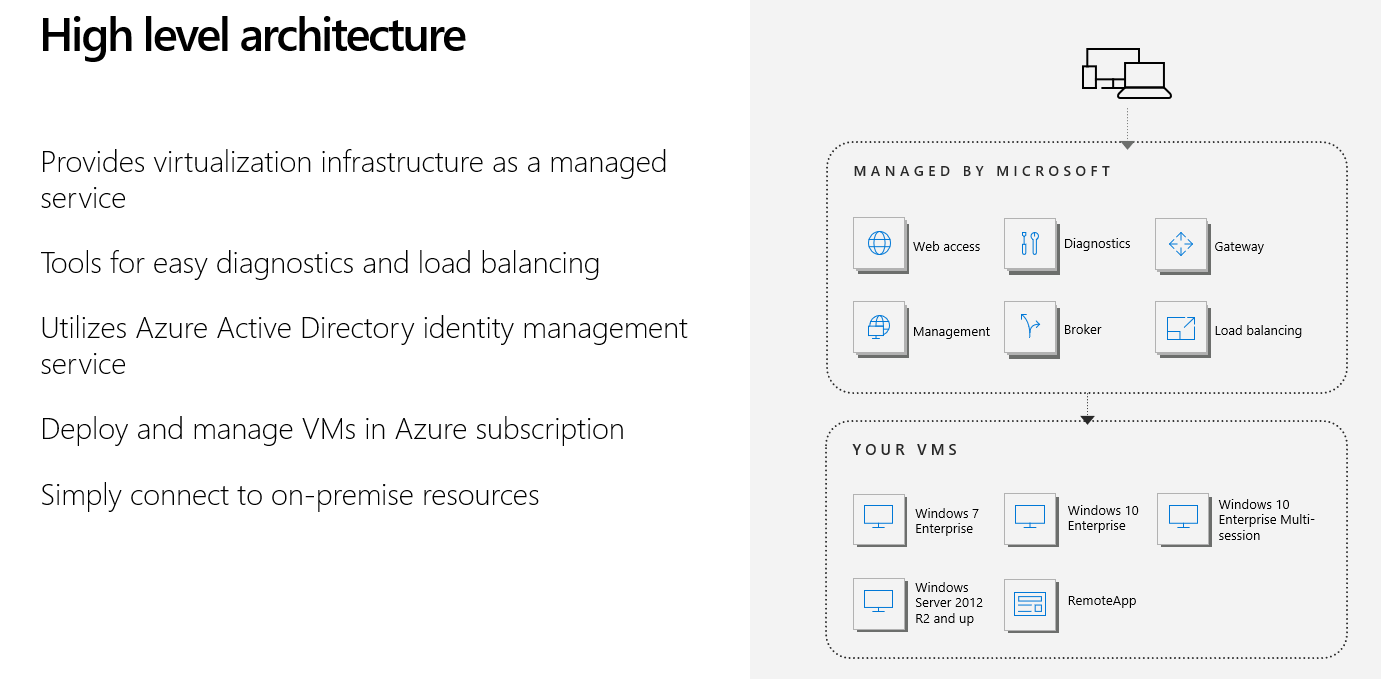
Intro
There are a few preleminary steps required before you can go the Azure portal and deploy your WVD Host Pool from the Azure Marketplace.
- First we need to create a tenant in the Windows Virtual Desktop service
- Then we need to create a service principal in Azure AD and assign role assignments
- Once this is done we can deploy our host pool from the Azure Marketplace
Create Tenant
We need to grant permissions to WVD to query our Azure Active Directory and peform administrative and end-user tasks.
Make sure you are a global admin within AAD and have the AAD tenant ID and subscription ID handy. Also keep or save any PowerShell outputs, secrets, APPids, names etc as you will need it later in the deployment process
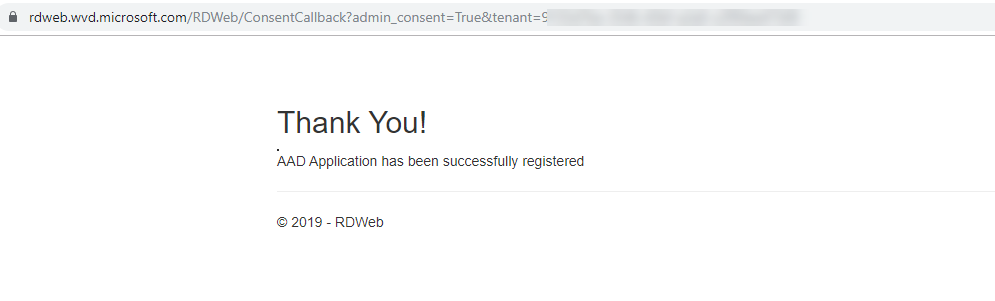
- Open a browser and go to Windows Virtual Desktop Server app
- Sign in with the global admin account and select accept
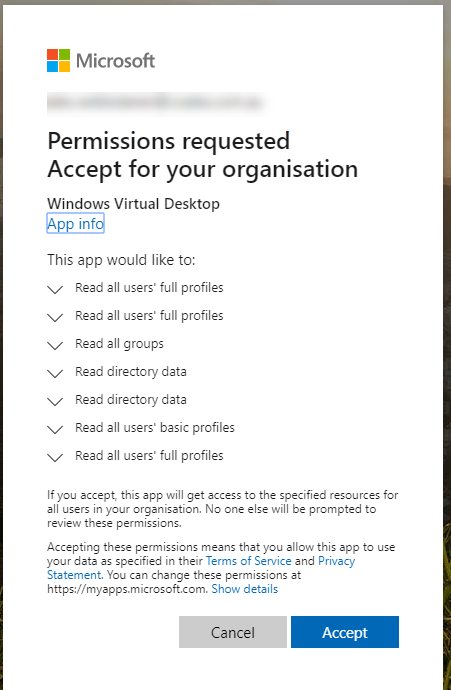
- Do the same thing for the Windows Virtual Desktop Client App
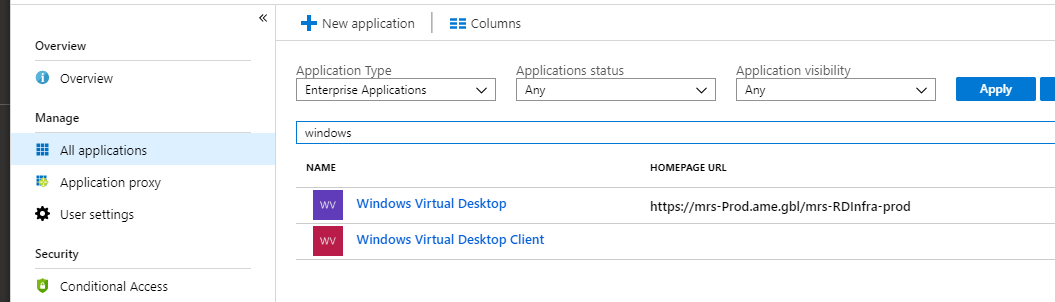
- After the 2 WVD applications have been created in AAD we need to assign someone the TenantCreator Application Role in AAD. The TenantCreator application role allows that user to create a new WVD tenant associated with AAD. Open the Azure portal, go to AAD, select Enterprise Applications and search for Windows Virtual Desktop.
 Select users and groups (you will already see one user listed but that is not enough), click add user. Select the user you want and give him the TenantCreator role.
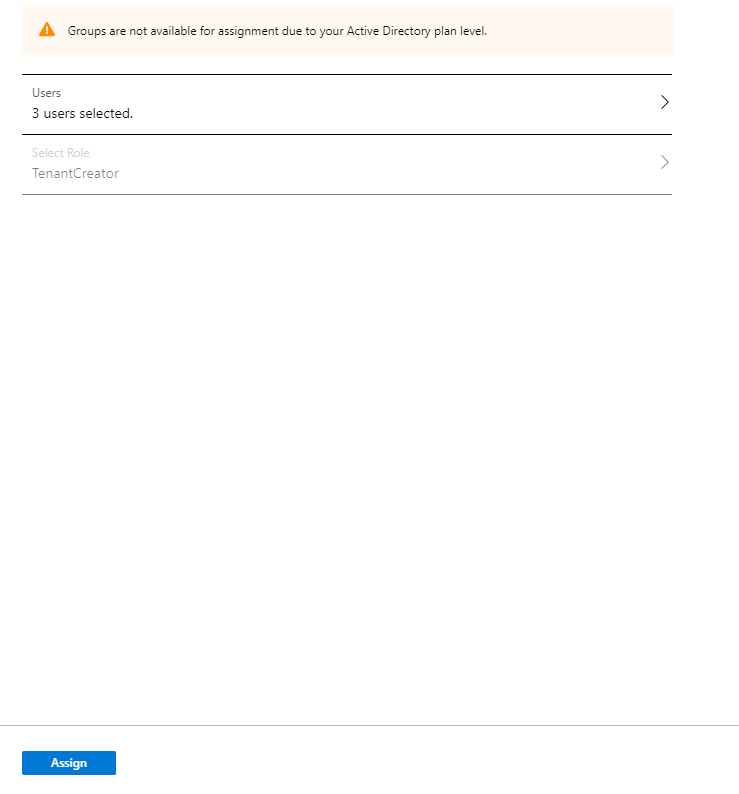
You can’t select a group at this stage or a service principal. You can only select users for the TenantCreater role.
Now that we have given the WVD service the necessary permissions to query AAD we can start creating our WVD tenant. This needs to be done in PowerShell with the WVD Module
5 Login to WVD with a user that has the TenantCreator role
Add-RdsAccount -DeploymentUrl "https://rdbroker.wvd.microsoft.com"
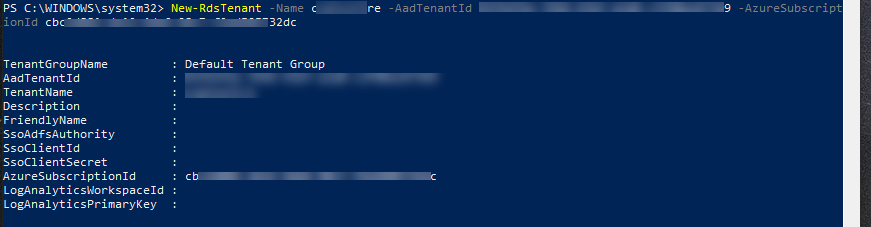
6 Create a new WVD tenant and replace the tenantname, AAD ID and subscriptionID with your details.
New-RdsTenant -Name <TenantName> -AadTenantId <DirectoryID> -AzureSubscriptionId <SubscriptionID>
Create a Service Principal
Next we need to create a Service Principal in AAD. This service principal will be used in WVD to perform WVD management tasks and will be used as credentials when deploying ARM templates for WVD where users are required to use MFA.
- Make sure you have the AzureAD Powershell module installed
Import-Module AzureAD
$aadContext = Connect-AzureAD
$svcPrincipal = New-AzureADApplication -AvailableToOtherTenants $true -DisplayName "Windows Virtual Desktop Svc Principal"
$svcPrincipalCreds = New-AzureADApplicationPasswordCredential -ObjectId $svcPrincipal.ObjectId
2 Create a role assigment so that the service principal can sign in to WVD
$myTenantName = "<Windows Virtual Desktop Tenant Name>"
New-RdsRoleAssignment -RoleDefinitionName "RDS Owner" -ApplicationId $svcPrincipal.AppId -TenantName $myTenantName
3 After you have assigned the TenantRole role to the service principal make sure you can sign in to WVD:
$creds = New-Object System.Management.Automation.PSCredential($svcPrincipal.AppId, (ConvertTo-SecureString $svcPrincipalCreds.Value -AsPlainText -Force))
Add-RdsAccount -DeploymentUrl "https://rdbroker.wvd.microsoft.com" -Credential $creds -ServicePrincipal -AadTenantId $aadContext.TenantId.Guid
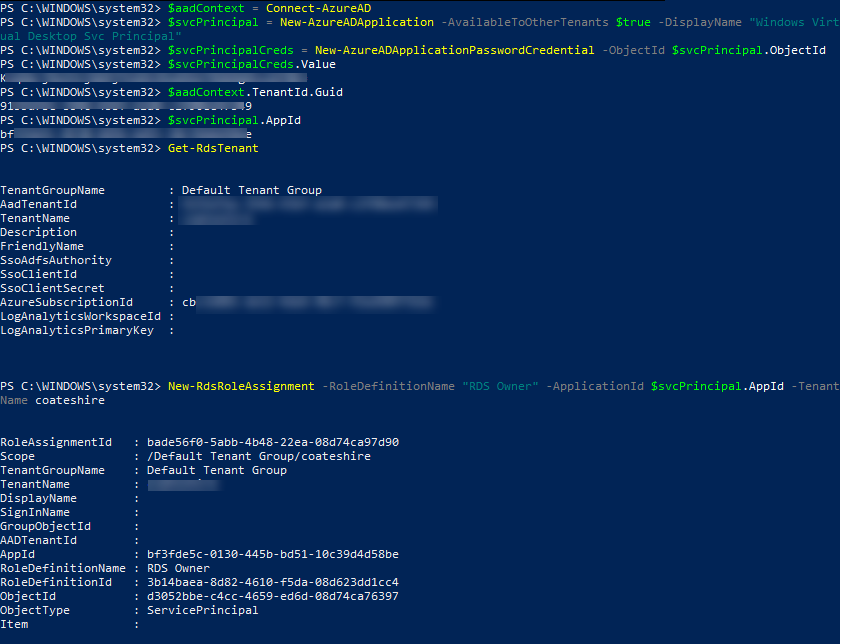
Make sure to keep the secret and appid close by as we will need it in the next step.
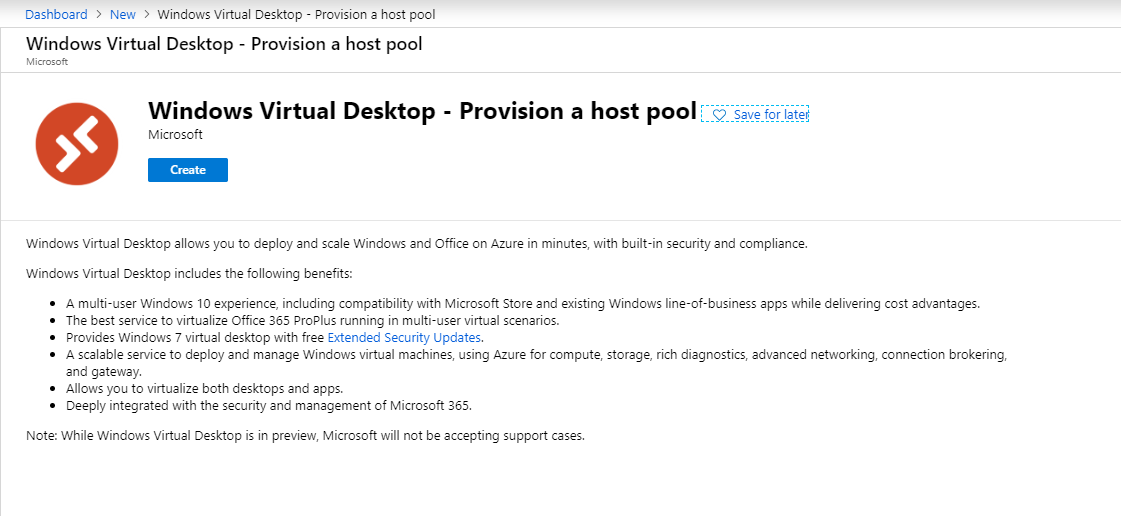
Deploy a host pool from Azure Marketplace
Now that all the pre-requisites are deployed and configured we can deploy our host pool in Azure.
- Login to the Azure Portal and select Create resource, Windows Virtual Desktop and Click create
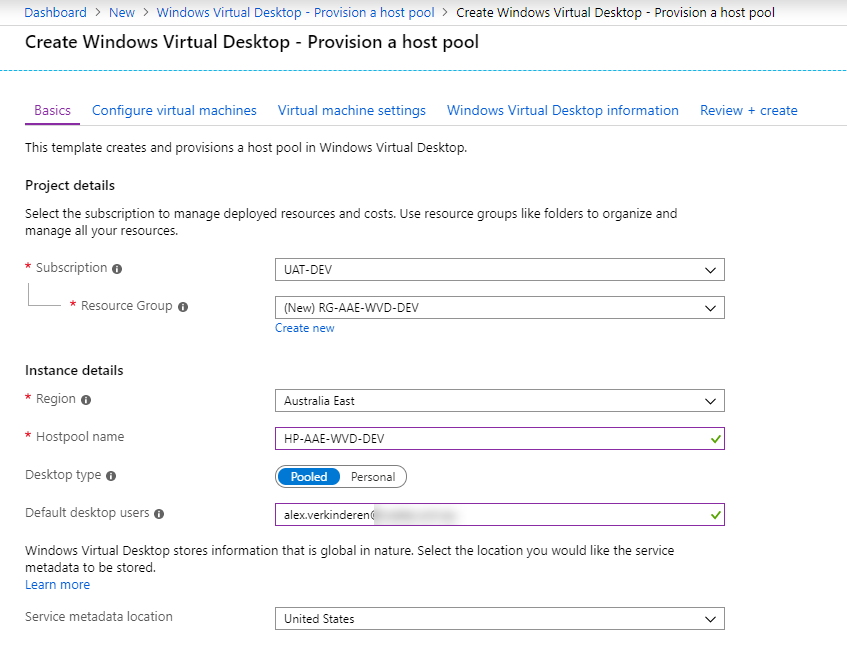
2 Basics
In the Basisc blade select your subscription and resource group you want to use. Provide the name of the hostpool (this will be the name the end users will see from the Remote Web Client) and choose if you want the desktops to be pooled or personal.
3 Configure Virtual Machines
Accept the default or customize the number and size of the VMs you want to deploy. For my poc I changed it to 1 machine. Provide a prefix for the names of the virtual machines and select OK.

The prefix you specified earlier for the VMs will also be used to name the underlying resources like the Nic, disk etc. If those names don’t comply with your internal naming convention you will need to modify the WVD templates.
4 Virtual Machines Settings
Select the Image source and specify a UPN and password for the domain join. Make sure to select a VNET and a subnet that have access to your domain controller as the machines will automatically be joined to your domain.
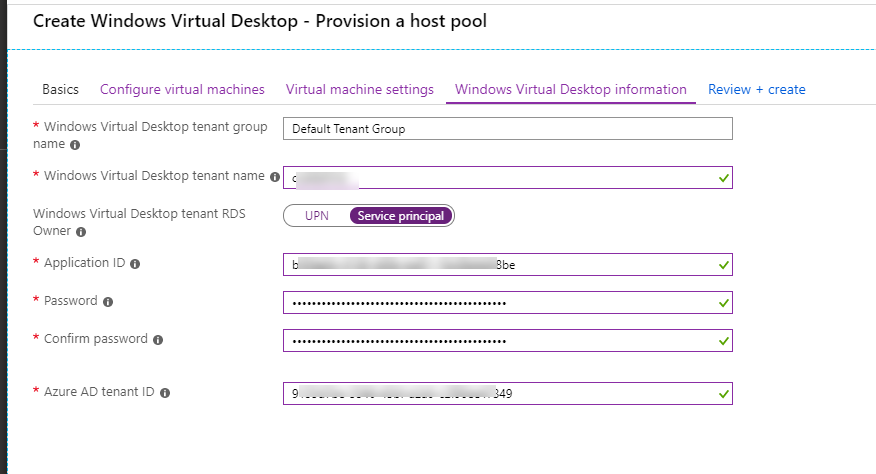
5 Windows Virtual Desktop tenant Information
In the tenant blade we need to provide information regarding our WVD tenant we created earlier in PowerShell. Make sure to select Service principal and provide the application ID, Tenant ID and for password provide the App Secret that was created earlier.
6 Complete setup
On the summary blade review your setup and click create.
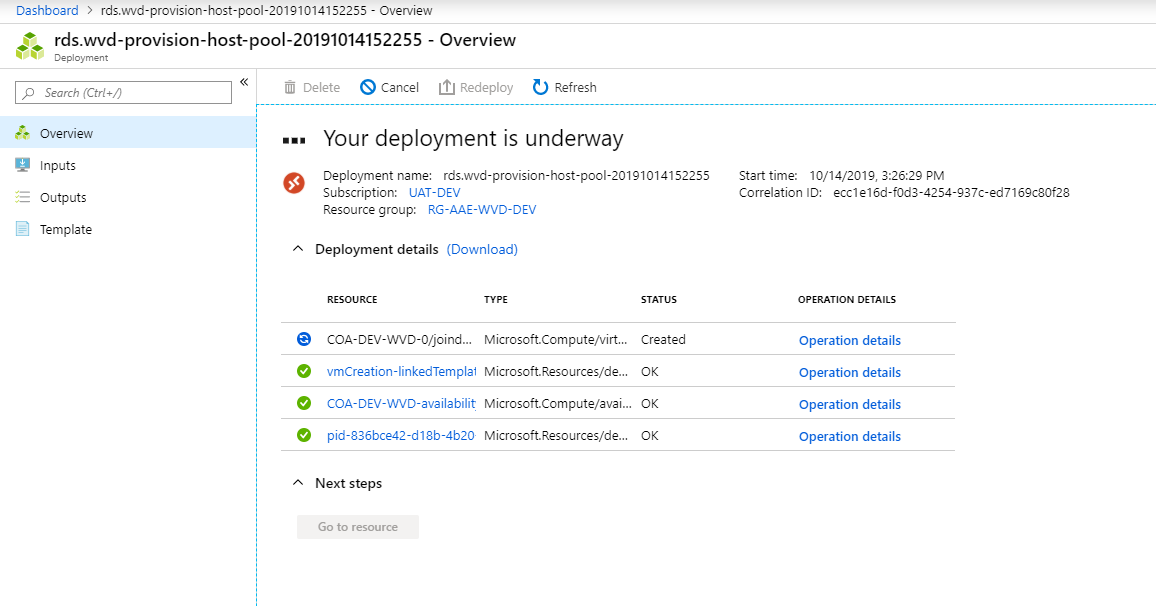 Wait for the deployment to complent and you will then be able to login to your virtual desktop using the web client for example.

Conclusion
As you can see we have quite a few preleminary steps we need to execute before deploying our WVD host pool. Make sure to keep the APPids, secrets etc close by as you will need them during deployment.
Alex
Leave a comment